This is the last Christmas cookie recipe in my short series on Christmas Cookies, and I present the Bûchettes de Noël.
Bûchettes de Noël
The classic Bûche de Noël is the French Christmas cake in the shape of a Yule log. The name of these cookies derived from the “ettes” meaning little logs, and is a miniature version of the classic cake, but made with a cocoa infused meringue. Oh, and they are perfect with hot cocoa, coffee, cognac, a hot toddy or even milk. The ingredients and procedures in this recipe are modified but follow very closely with those found in the cookbook, Rose’s Christmas Cookies, by Rose Levy Beranbaum. This batch will yield about 12 ounces of meringue cookies.
Ingredients
Volume
Weight
Ingredient
1 Cup
4 Ounces
Powdered Sugar
2 Tbsp
0.5 Ounces
Cocoa, unsweetened
½ Cup
4.25 Ounces
Egg whites, room temperature
½ Tsp
–
Cream of Tartar
1 Tbsp + ½ Cup
4 Ounces
Superfine Sugar
Procedure Steps
1.
In a small bowl combine the powdered sugar and cocoa.
2.
In the bowl of an electric mixer beat the egg whites until frothy then add the cream of tartar and continue to beat at medium speed while gradually adding 1 tablespoon of the superfine sugar. When soft peaks are formed add 1 tablespoon more of the superfine sugar, then increase the mixer speed to high. When stiff peaks are formed gradually beat in the remaining superfine sugar and continue until stiff and glossy.
3.
Soft the cocoa and powdered sugar mixture into the meringue and fold it in gently using a large wire whisk or rubber spatula.
4.
Spoon the meringue mixture into a pastry bag fitted with a #6 star tip.
5.
Hold the pastry bag at a slight angle and with the tube several inches above the parchment lined sheet pan. Apply an even pressure on the bag and starting from the top of the sheet pan squeeze evenly allowing the meringue to drop from the tube onto the parchment and continue to pipe out the meringue to the bottom of the pan. Be sure to leave at least ½ inch between each row of piped meringue, they do not have to be exactly straight, use your creativity for varied s-curves or shapes if you are up to being innovative.
6.
Allow the meringue lines to dry for 1 hour at room temperature, then bake in a pre heated 200° F oven for another hour or until completely set. Rotate the sheet pans after 45 minutes for even baking. Cool completely before carefully removing them from the parchment paper. Then break them into 4 to 6 inch portions.
These can be stored in an airtight container for up to a few months in low humidity.
Quick Tips
For better texture use old egg whites
Ensure that the bowl, beater and egg whites are free of grease, including even a speck of egg yolk
Egg whites can be frozen for up to 1 year
Do not open the oven door during the first three quarters of the drying stages, this will cause cracking of the meringue
Meringue will stick to wax paper, do not use it or your finished product will fall apart when removing
Avoid crowding the cookie sheet, spread out the caps and stems to ensure even air space
Superfine sugar makes for a lighter meringue and can be made from granulated sugar. Just put the granulated sugar into the bowl of a food processor and allow it to run until the sugar is a fine grain
When folding in the cocoa/powdered sugar use a wire whisk to gently add them while preserving the volume of the meringue
Meringue mixtures should be shaped or piped right after preparing, if you are short on sheet pans line a sheet of parchment or foil on the counter top that is the same surface area as your single sheet pan, when the first batch is done, simply slide off the parchment and slip the sheet pan under the next batch
Both volume and weight measurements have been given in this recipe as professional bakers and pastry chefs utilize weighted products and specifications for their recipes and formulas. Weighted ingredients give more control over the product and omit any variation due to storage temperature, humidity and elevation differences
Continuing in the Christmas Cookie series this post will feature the Meringue Mushrooms, and then the next post in this short series will end with the Bûchettes de Noël.
Meringue Mushrooms
Probably the first reference to these delightful treats was from Maida Heatter who is among one of the better-known cookbook authors, especially concerning baking and desserts. These are another fun holiday dessert cookie treat and when dusted with cocoa powder take on an almost perfect mushroom look. This recipe calls for superfine sugar, which is not the same as powdered sugar, but granulated sugar that is of a finer grain than normal sugar. If you cannot find superfine sugar, you can take normal granulated sugar and run in the bowl of a food processor until the finer grain is achieved. This cookie uses two pastry bags for piping, one for forming the caps and stems and the other to “glue” them together.
This recipe makes about 30 1 ½ – inch mushrooms. The ingredients and procedures in this recipe are modified but follow very closely with those found in the cookbook, Rose’s Christmas Cookies, by Rose Levy Beranbaum.
Ingredients
Volume
Weight
Ingredient
¼ Cup
2 Ounces
Large Egg whites at room temperature
¼ Tsp
–
Cream of Tartar
½ Cup + 1 Tbsp
4 Ounces
Superfine sugar
Procedure Steps
1.
Using an electric mixer beat the egg whites in the bowl until frothy, then add the cream of tartar and continue to beat at medium speed then gradually add 2 tablespoons of the superfine sugar.
2.
Continue to beat until soft peaks form when the beater is raised, then add 1 tablespoon of superfine sugar and increase the speed to high. When stiff peaks form gradually beat in the remaining superfine sugar and continue to beat until very stiff and glossy.
3.
Fill a large pastry bag fitted with a #6 tip with most of meringue mixture and a smaller pastry bag fitted with a #3 tip. The larger bag is used to pipe the caps and stems, and the smaller bag is used to “glue” them together.
4.
To pipe the caps: Hold the large pastry bag upright with the tube slightly above a baking sheet lined with parchment paper or aluminum foil. Squeeze a steady even pressure flow of the meringue and raise the tube as the meringue begins to build up, but keep the tip buried in the meringue. When a well-rounded shape is achieved, stop the pressure as you bring the tip out of the meringue, then use the tip to shave off any point that might form, moving clock-wise. On the other hand, to remove any points that form use a moistened fingertip to press them down into the meringue.
5.
To pipe the stems: Hold the pastry bag upright with the tube touching the lined baking sheet. Squeeze with a heavy pressure with the tip buried in the meringue until you create a cone about ¾ inch high and wide at the base and tapered toward the top.
6.
Allow the caps and stems to air-dry for at least one hour or until set.
7.
Pre-heat oven to 200° F and bake the caps and stems for 45 minutes or until the mushrooms are firm enough to be lifted from the lined baking sheets.
8.
With a small paring knife, make a small hole in the bottom and center of each cap, then put a small dab of the wet meringue from the smaller pastry bag to “glue” and attach a stem. Do this for all the caps and stems.
9.
Place the mushrooms back to the sheet pan and return to the low temperature oven for another 20 minutes or until completely dry.
Quick Tips
For better texture use old egg whites
Ensure that the bowl, beater and egg whites are free of grease, including even a speck of egg yolk
Egg whites can be frozen for up to 1 year
Do not open the oven door during the first three quarters of the drying stages, this will cause cracking of the meringue
Meringue will stick to wax paper, do not use it
Avoid crowding the cookie sheet, spread out the caps and stems to ensure even air space
Both volume and weight measurements have been given in this recipe as professional bakers and pastry chefs utilize weighted products and specifications for their recipes and formulas. Weighted ingredients give more control over the product and omit any variation due to storage temperature, humidity and elevation differences
Inspired by Rose Levy Beranbaum and three of her books that I own, the first one in my collection is The Cake Bible, the second is Rose’s Christmas Cookies, and the third one of her many books is A Passion For Chocolate, and all of them are first rate books. If you do not have any of these in your cookbook collection, I highly recommend them all for addition to your library. In particular since I did not get any formal pastry or dessert training other than one introductory class in 1983 during my apprenticeship, most of my baking has been self taught or from cookbooks, such as Rose’s. Apprentices are given the choice of going the culinary route or the pastry route, thus I chose the culinary route. In the holiday spirit, I enjoy making Christmas cookies so for the next few days I will share with you three of my favorites. The first is the Christmas Wreaths made with cornflakes and marshmallows, Meringue Mushrooms, and then the Bûchettes de Noël to round out this short Christmas Cookie Series.
Christmas Wreath Cookies
These are some of the cutest and easiest Christmas cookies to make; these wreaths are made with marshmallows, cornflakes, green food color and red-hot’s for decoration. Not only are they great to eat, but you can make decorations out of them on the mantle, window frame, or Christmas tree by just air-drying them for several days uncovered. The recipe will yield about 18 or so 2-inch wreaths.
One of the tricks with getting these cookies formed quickly is to keep the mixture warm while working the cookies into wreath shapes. Once the cookie mixture is done, you will want to set the saucepan into another pan of warm water. Alternatively, in my case I like to transfer the cookie mixture into a large stainless steel bowl, and then set the bowl over warm water bath in a large saucepan. The cookies are dropped in heaping tablespoons onto wax paper and the formed into tiny wreath shapes, and before completely set-up, the red-hot’s are placed for decoration. The ingredients and procedures in this recipe are modified but follow very closely with those found in the cookbook, Rose’s Christmas Cookies, by Rose Levy Beranbaum.
Ingredients
Volume
Weight
Ingredient
½ Cup
4 Ounces
Unsalted butter
3 Cups
7.25 Ounces
Marshmallows, Large (30)
1 ½ Tsp
–
Green food coloring liquid
1 Tsp
–
Vanilla extract
4 Cups
5 Ounces
Cornflakes
2 Tbsp
1 Ounce
Cinnamon Red-Hot’s candies
Procedure Steps
1.
Lightly grease or coat with non-stick spray a large sized saucepan. Also, have another large saucepan with warm water at the ready.
2.
Add the butter over low heat and then add the marshmallows and melt them over a low heat, stirring constantly until smooth, or about 5 to 7 minutes.
3.
Remove the pan from the heat and fold in the green food coloring and the vanilla extract until well blended with a wire whisk.
4.
Stir in the cornflakes to evenly coat them well.
5.
Transfer the cookie mixture into a large bowl, such as a stainless steel bowl and place this into the warm water that we set up in step 1. This is to keep the mixture from setting up to quickly.
6.
Use 2 spoons or lightly greased fingers and drop heaping tablespoons of the cookie mixture onto wax paper. With the greased fingers, quickly form the wreath shape with holes in the center, and while the cookie is still sticky decorate with the red-hot candies.
These cookies will keep for up to a month when stored in an airtight container, or indefinitely as ornaments.
Both volume and weight measurements have been given in this recipe as professional bakers and pastry chefs utilize weighted products and specifications for their recipes and formulas. Weighted ingredients give more control over the product and omit any variation due to storage temperature, humidity and elevation differences
Christmas Wreath Cookies setting up in the parchment paper lined pans
Popular Salads and Cold Appetizers at the Columns Hotel
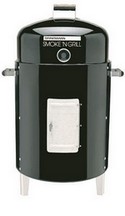
A salad from the specials rotation menu, the Smoked Seafood Salad, would sell out each and every day during the week it was featured. In fact, I can remember stoking the smoker with double batches of medium shrimp (21-30 ct.), oysters, and bay scallops to be smoked in preparation for weekend dinner service. The columns hotel did not have any special smoker pit; we used one just like the image on the left. (Click the link above to view one of the special menus from 1986.)
Typical procedure for smoking seafood
First, you want to make sure you have some wood for smoking that has been soaking in water for several hours at least; the wetter the wood the better, and it will give you more smoke and the wood will have a slow burn. The Columns Hotel used Mesquite wood most of the time but on occasion we would get in some hickory, pecan, or oak. The Mesquite came in huge chunks, about two to four inches in diameter, and this was great for stoking the fire and letting it sit without much babying. The whole smoker set up was located outside the back kitchen door and away from any combustibles, for good reason.
Our next step has us lighting the charcoal and getting the coals hot in the bottom pan of the smoker, thus ensuring a good stoked fire. As the coals were getting hot, we run back inside to set up the seafood.
The two round wire racks of the smoker are first covered with aluminum foil and then several holes are punched through the foil with the blunt end of your common sharpening steel. Or, you could use any rounded tool with about a ½-inch diameter to poke holes into the foil lining. The foil and the holes are done to allow the smoke to freely move among the chamber but also and importantly, to keep the food product from falling out and making a really big mess…and to keep chef happy…thus preventing any undue scorn that might befall the apprentice.
Then in a small bowl each of the individual seafood ingredients is coated one at a time with a tiny bit of olive oil, just enough to coat and then seasoned with a small amount of salt and white pepper. For example, for the first smoker session, a rack of oysters and a rack of shrimp are set up, thus about 3 dozen or so shrimp are lightly coated with the olive oil and then seasoned in the bowl, and laid out on the foil covered tray, ensuring not to cover up too many of the holes you poked earlier. Then about 2 or 3 dozen oysters are seasoned in the bowl and laid out on their foil covered rack. The same procedure for the bay scallops during the next smoking session, though more like 3 to 5 dozen of these little popcorn like tasty morsels are arranged on the foil lined rack.
Once the seasoned seafood is set up on the foil lined wire racks, it is time to check the fire again and typically, the hot coals are ready for the wet wood by this time. Starting out with an equivalent of several cups of wet wood this is enough to start the smoke process. The 2-cup or so portion of wet wood is taken out of the soaking water and allowed to drain for a minute or so, nothing like putting out your fire and having to start over again….resulting in more scorn from the chef. The drained wet wood is gently placed onto the hot coals without disturbing them too much.
Then the two racks of seafood are set into the smoker and the lid placed on top for the smoking process. Typically, the seafood only needs about an hour or so under the smoke, the shrimp may take longer if larger sized, but the oysters and bay scallops only need about an hour and they are ready.
Once the seafood is smoked….know how do you know when they are done? Good question…and glad you asked…the seafood will take on a nice smoky light-brown hue and will become opaque, and the only sure-fire way to know when they are done is to sample a taste of the shrimp, or a scallop. The smoked scallops are like eating popcorn, just give me a bowl and I could eat several pounds of these tasty morsels. Now the oysters are okay if they are not completely cooked, but remember that overdone seafood is not that appetizing. So undercooking them a bit will not hurt, these will all be combined later in the Columns Hotel Vinaigrette Dressing which will also lend some cooking as well, as in a marinating process similar to ceviche.
The smoked scallops are like eating popcorn, just give me a bowl and I could eat several pounds of these tasty morsels.
I have cut down the typical restaurant portion for the salad recipe, it was one that never actually had a set list of ingredients, in fact, on occasion we would also smoke crab claws and add them to the salad as well. However, for simplicity sake, I have listed the ingredients here, and as a guideline, and this would yield about eight portions. Also, note that the weights for the seafood are after they are smoked, so be sure to purchase more than the amount listed because the seafood will shrink in size and weight after they are smoked.
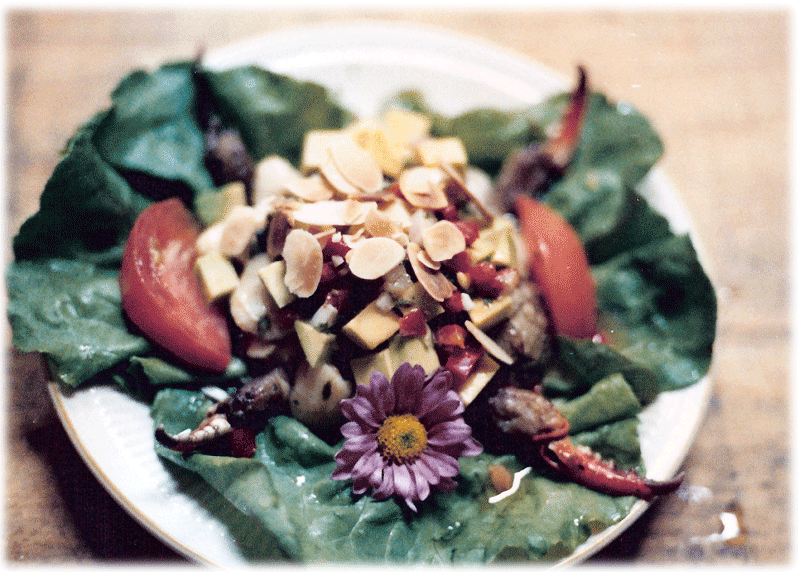
My apologizes for the quality of the image at the top right, this is a scan of a 4” x 6” image of the plated Smoked Seafood Salad that was taken and printed sometime around 1985 or 1986. Fuzzy most likely because I was rushing…it was going to be served really soon to an awaiting customer.
In a large stainless steel bowl, add the smoked shrimp, bay scallops, and oysters. Toss the seafood gently with the vinaigrette dressing and allow to marinate for about an hour or so.
2.
Plating: When ready to serve line the plates with the lettuce leaves. Add the diced avocado to the smoked and marinated seafood, and toss well to incorporate. Spoon equal portions of the seafood, avocado, and dressing in the middle of the plate. Top with the remaining dressing if desired.
3.
Garnish each salad with two tomato wedges and a sprinkling of toasted almonds, or about 1 Tbsp per salad.
4.
Arrange 4 crab claws per salad in any fashion; however, as shown in the image above they are placed at the analog clock positions of 2, 4, 8, and 10. Then an edible flower is placed at the six-o’clock position.


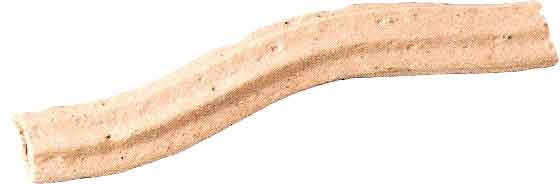 The classic Bûche de Noël is the French Christmas cake in the shape of a Yule log. The name of these cookies derived from the “ettes” meaning little logs, and is a miniature version of the classic cake, but made with a cocoa infused meringue. Oh, and they are perfect with hot cocoa, coffee, cognac, a hot toddy or even milk. The ingredients and procedures in this recipe are modified but follow very closely with those found in the cookbook, Rose’s Christmas Cookies, by Rose Levy Beranbaum. This batch will yield about 12 ounces of meringue cookies.
 Probably the first reference to these delightful treats was from Maida Heatter who is among one of the better-known cookbook authors, especially concerning baking and desserts. These are another fun holiday dessert cookie treat and when dusted with cocoa powder take on an almost perfect mushroom look. This recipe calls for superfine sugar, which is not the same as powdered sugar, but granulated sugar that is of a finer grain than normal sugar. If you cannot find superfine sugar, you can take normal granulated sugar and run in the bowl of a food processor until the finer grain is achieved. This cookie uses two pastry bags for piping, one for forming the caps and stems and the other to “glue” them together.